
오랜만에 기술 팁을 작성하겠습니다. 사실 JWT 관련해서 글을 계속 작성하고 있었는데, 프로젝트도 있고 개강을 한 지 얼마 되지 않아 바쁜 것도 있어서 팁 글은 거의 한 달 만에 올리네요.. 😭 프로젝트를 하며 바쁘게 된 것도 있지만 그 덕분에 REST Docs에 대해 더 잘 다룰 수 있게 되어 이 과정을 공유합니다.
이전 글에서는 document 메서드로 간단히 docs 패키지 아래에 html 문서들이 보관되는 것까지 다루었는데요, 이번에는 테스트를 통해 실제 문서가 작성되도록 하는 것을 알아보겠습니다.
기존 테스트 코드
기존 테스트 코드는 아래와 같습니다.
// import 표현은 생략

@DisplayNameGeneration(DisplayNameGenerator.ReplaceUnderscores.class)
@SuppressWarnings("NonAsciiCharacters")
@MockBean(JpaMetamodelMappingContext.class)
@AutoConfigureRestDocs
@WebMvcTest(BoardController.class)
public class BoardControllerWebMvcTest {

    @Autowired
    private MockMvc mockMvc;

    @Autowired
    private ObjectMapper objectMapper;

    @MockBean
    private BoardService boardService;

    @Test
    void 게시글을_저장한다() throws Exception {
        // given
        BoardWriteRequest request = new BoardWriteRequest("test title", "test content");
        Board newBoard = 게시글_id_있음();
        when(boardService.write(request)).thenReturn(newBoard);

        // when & then
        mockMvc.perform(post("/boards")
                        .contentType(APPLICATION_JSON)
                        .content(objectMapper.writeValueAsString(request)))
                .andExpect(jsonPath("$.id").value(newBoard.getId()))
                .andExpect(jsonPath("$.title").value(newBoard.getTitle()))
                .andExpect(jsonPath("$.content").value(newBoard.getContent()))
                .andDo(print())
                .andDo(document("boards/save"));
    }

    @Test
    void 게시글을_조회한다() throws Exception {
        // given
        Board writeBoard = 게시글_id_있음();
        when(boardService.findBoardById(any())).thenReturn(writeBoard);

        // when & then
        mockMvc.perform(get("/boards/" + writeBoard.getId()))
                .andExpect(jsonPath("$.title").value(writeBoard.getTitle()))
                .andExpect(jsonPath("$.content").value(writeBoard.getContent()))
                .andDo(print())
                .andDo(document("boards/find"));
    }
}
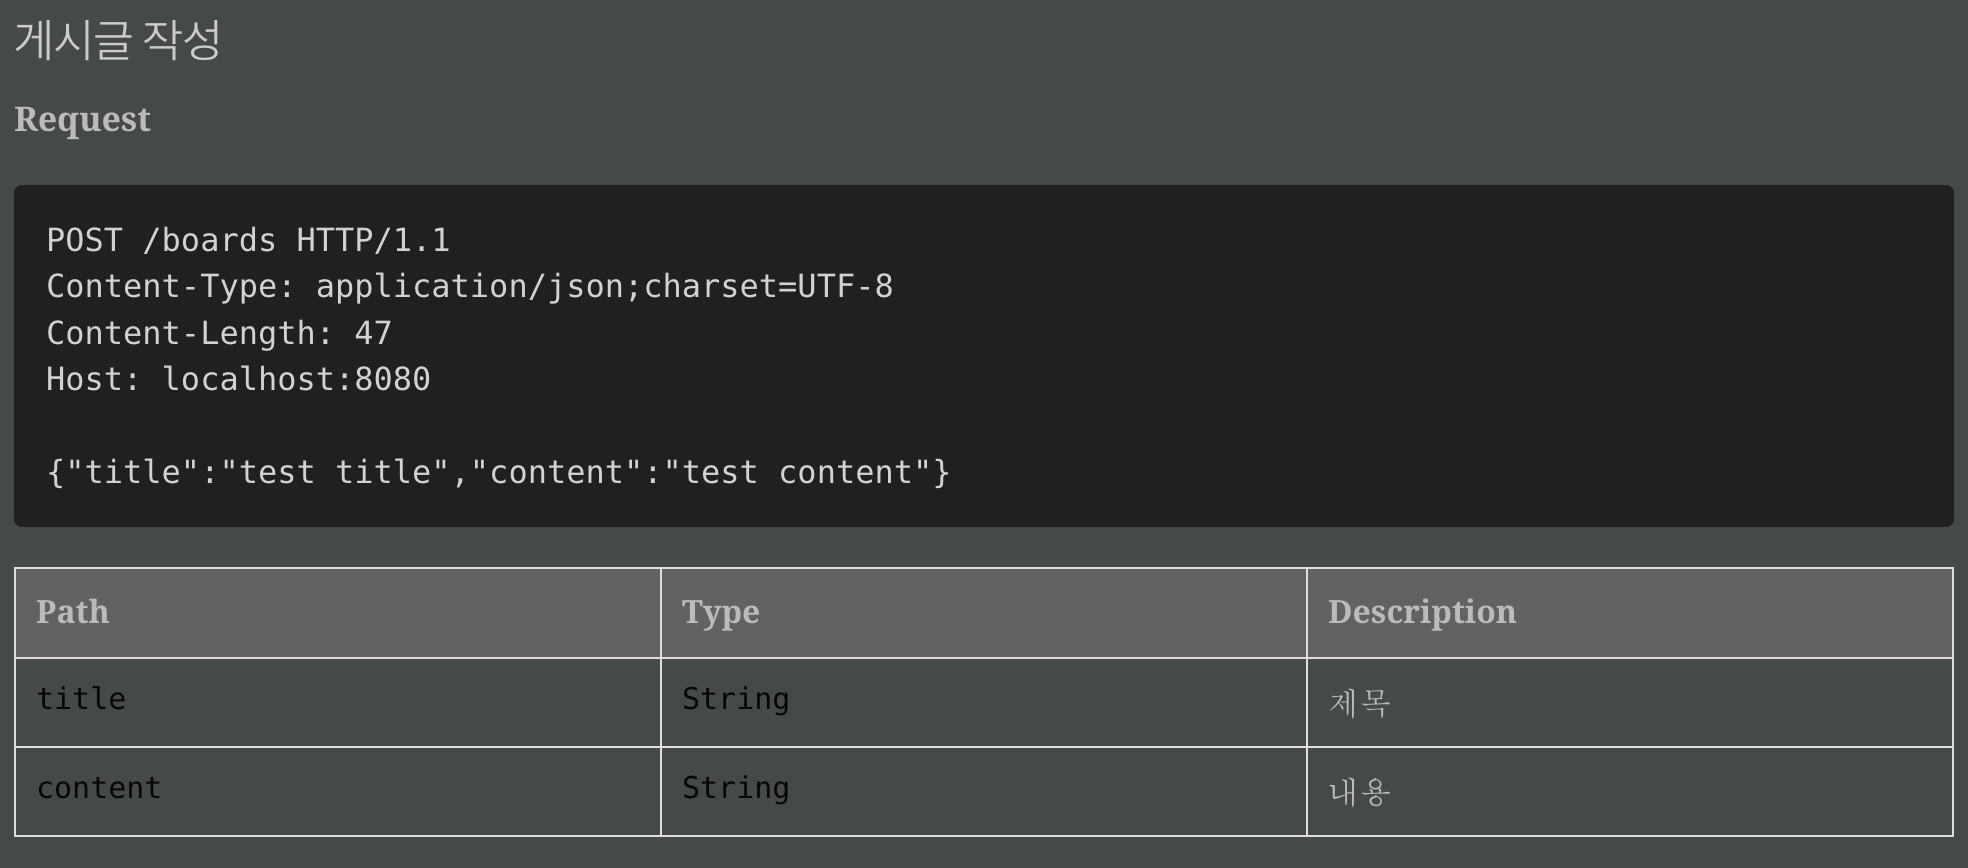
이에 따른 REST Docs 결과는 아래처럼 나옵니다. (요청의 경우)
curl-request.adoc

curl-request는 CURL 요청 형식을 보여줍니다.
http-request.adoc
http-request.adoc은 실제 HTTP에서 어떤 식으로 요청이 흘러가는지 (HTTP 메서드, 경로 등)를 모두 담고 있습니다.

request-body.adoc
request-body.adoc은 HTTP 중 body 부분만을 보여줍니다.

기존 문서의 아쉬운 점
기존 문서는 정확히 title, content 등이 어떤 뜻인지를 명시하지 않습니다. 또한, 만약 헤더에 인증 정보 (Authorization)가 들어간다면 이러한 부가적인 정보도 담을 수 없습니다. (이는 응답에서도 동일합니다.)
따라서, restdocs 안에 있는 메서드들로 설명을 직접 작성할 수 있습니다.
Request, Response Fields
공식 문서를 참고하여 Request와 Response의 필드를 작성해 보겠습니다.
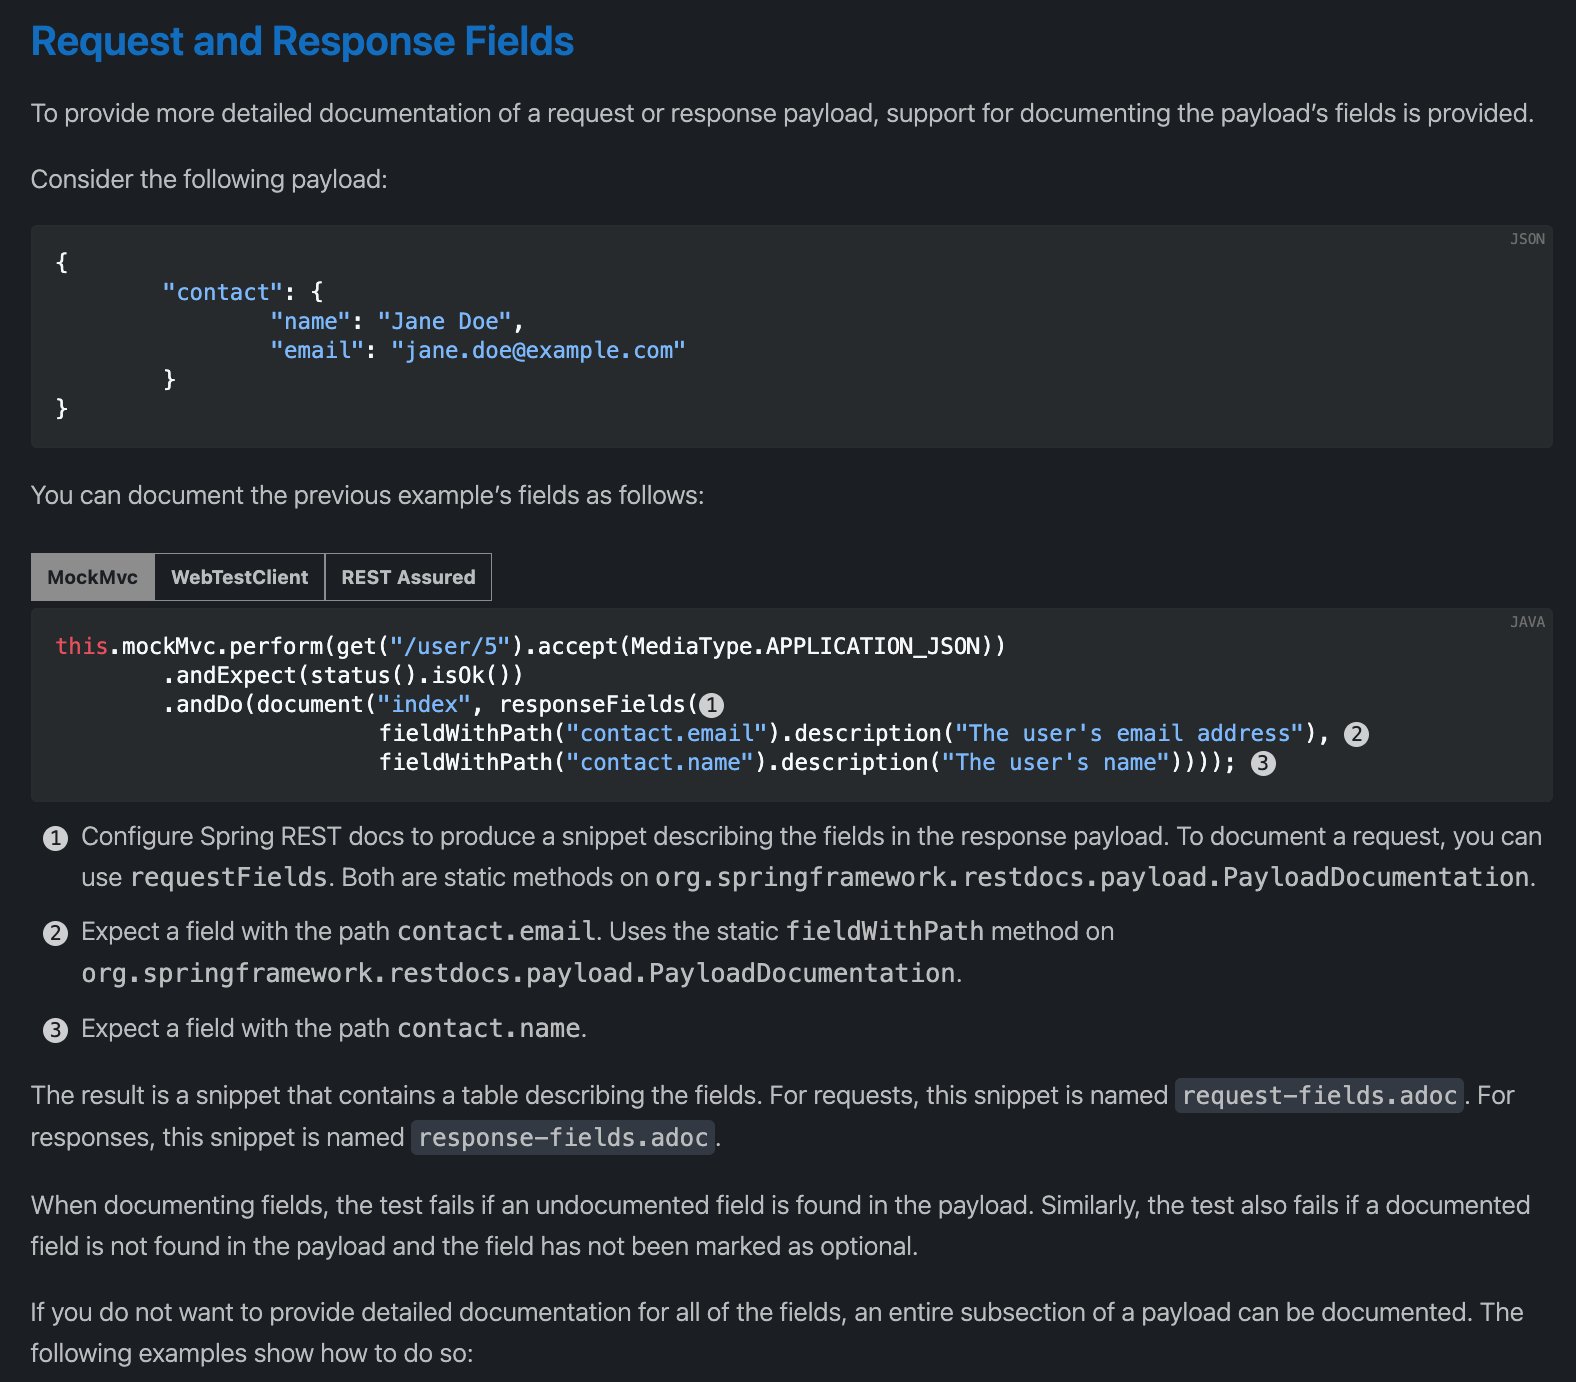
요청과 응답의 필드는 org.springframework.restdocs.payload.PayloadDocumentation의 requsetFields, responseFields를 활용하여 내용을 추가할 수 있습니다.
package org.springframework.restdocs.payload;

import ...

public abstract class PayloadDocumentation {
    private PayloadDocumentation() {
    }

    ...

    public static RequestFieldsSnippet requestFields(FieldDescriptor... descriptors) {
        return requestFields(Arrays.asList(descriptors));
    }

    public static RequestFieldsSnippet requestFields(List<FieldDescriptor> descriptors) {
        return new RequestFieldsSnippet(descriptors);
    }

    ...

    public static ResponseFieldsSnippet responseFields(FieldDescriptor... descriptors) {
        return responseFields(Arrays.asList(descriptors));
    }

    public static ResponseFieldsSnippet responseFields(List<FieldDescriptor> descriptors) {
        return new ResponseFieldsSnippet(descriptors);
    }

    ...
}
요청과 응답의 구조를 보니, FieldDescriptor가 공통으로 쓰이는 게 보입니다. 내부 코드를 보겠습니다.
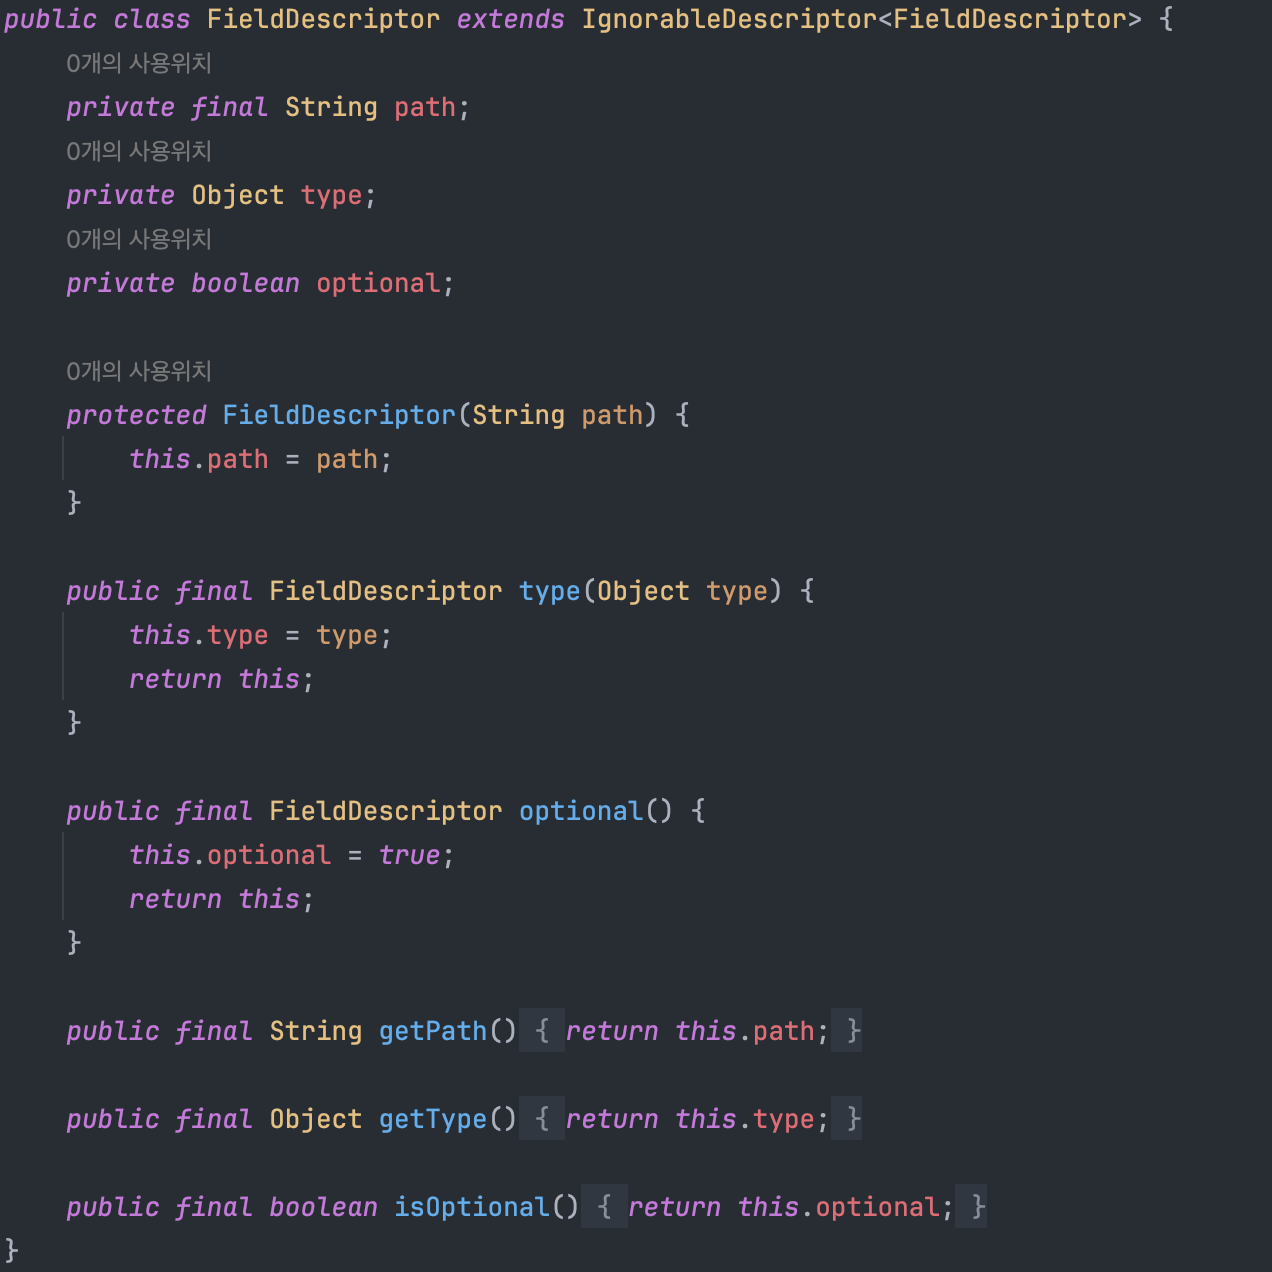
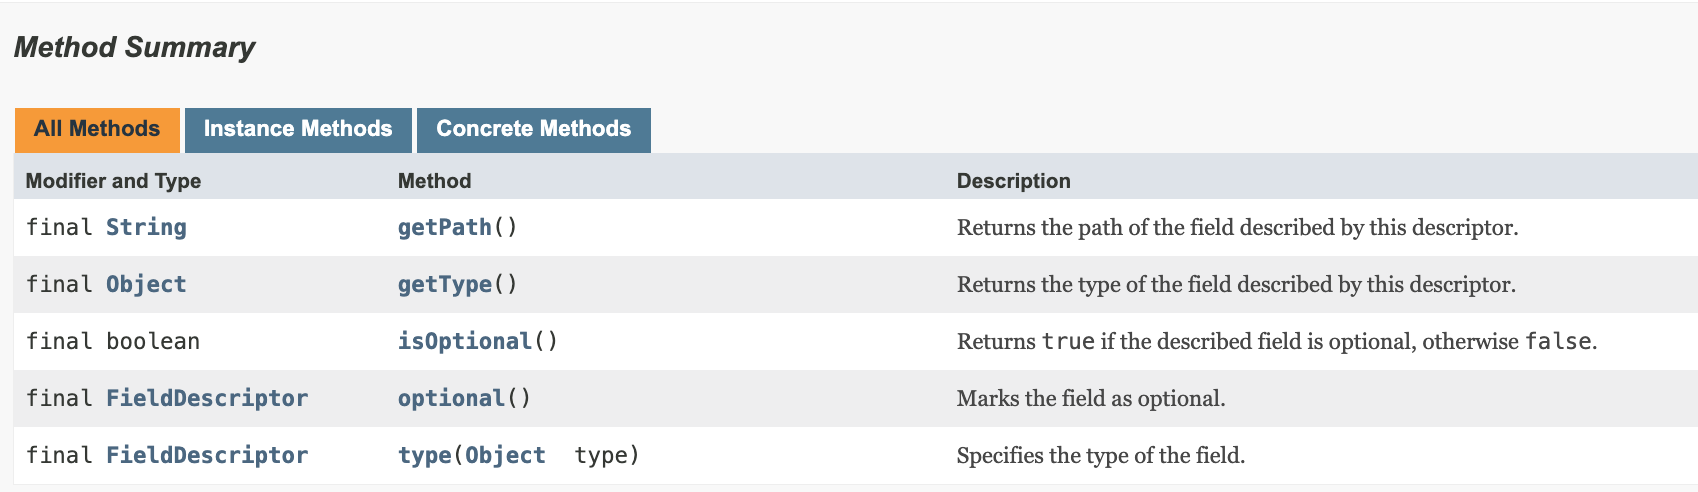
- path는 JSON 내에서의 경로를 뜻합니다.
- type은 묘사된 필드의 타입 (String, Number 등)을 뜻합니다.
- isOptional은 해당 필드가 필수적인지, 옵션인지를 뜻합니다.
그런데 위의 테스트 코드를 보면, description 즉 "설명"이 작성되어 있는 것을 볼 수 있습니다. 그런데 지금 FieldDescriptor에서는 보이지 않습니다. 이것은 FieldDescriptor > IgnorableDescriptor<FieldDescriptor> > AbstractDescriptor<T extends AbstractDescriptor<T>>에 있습니다.
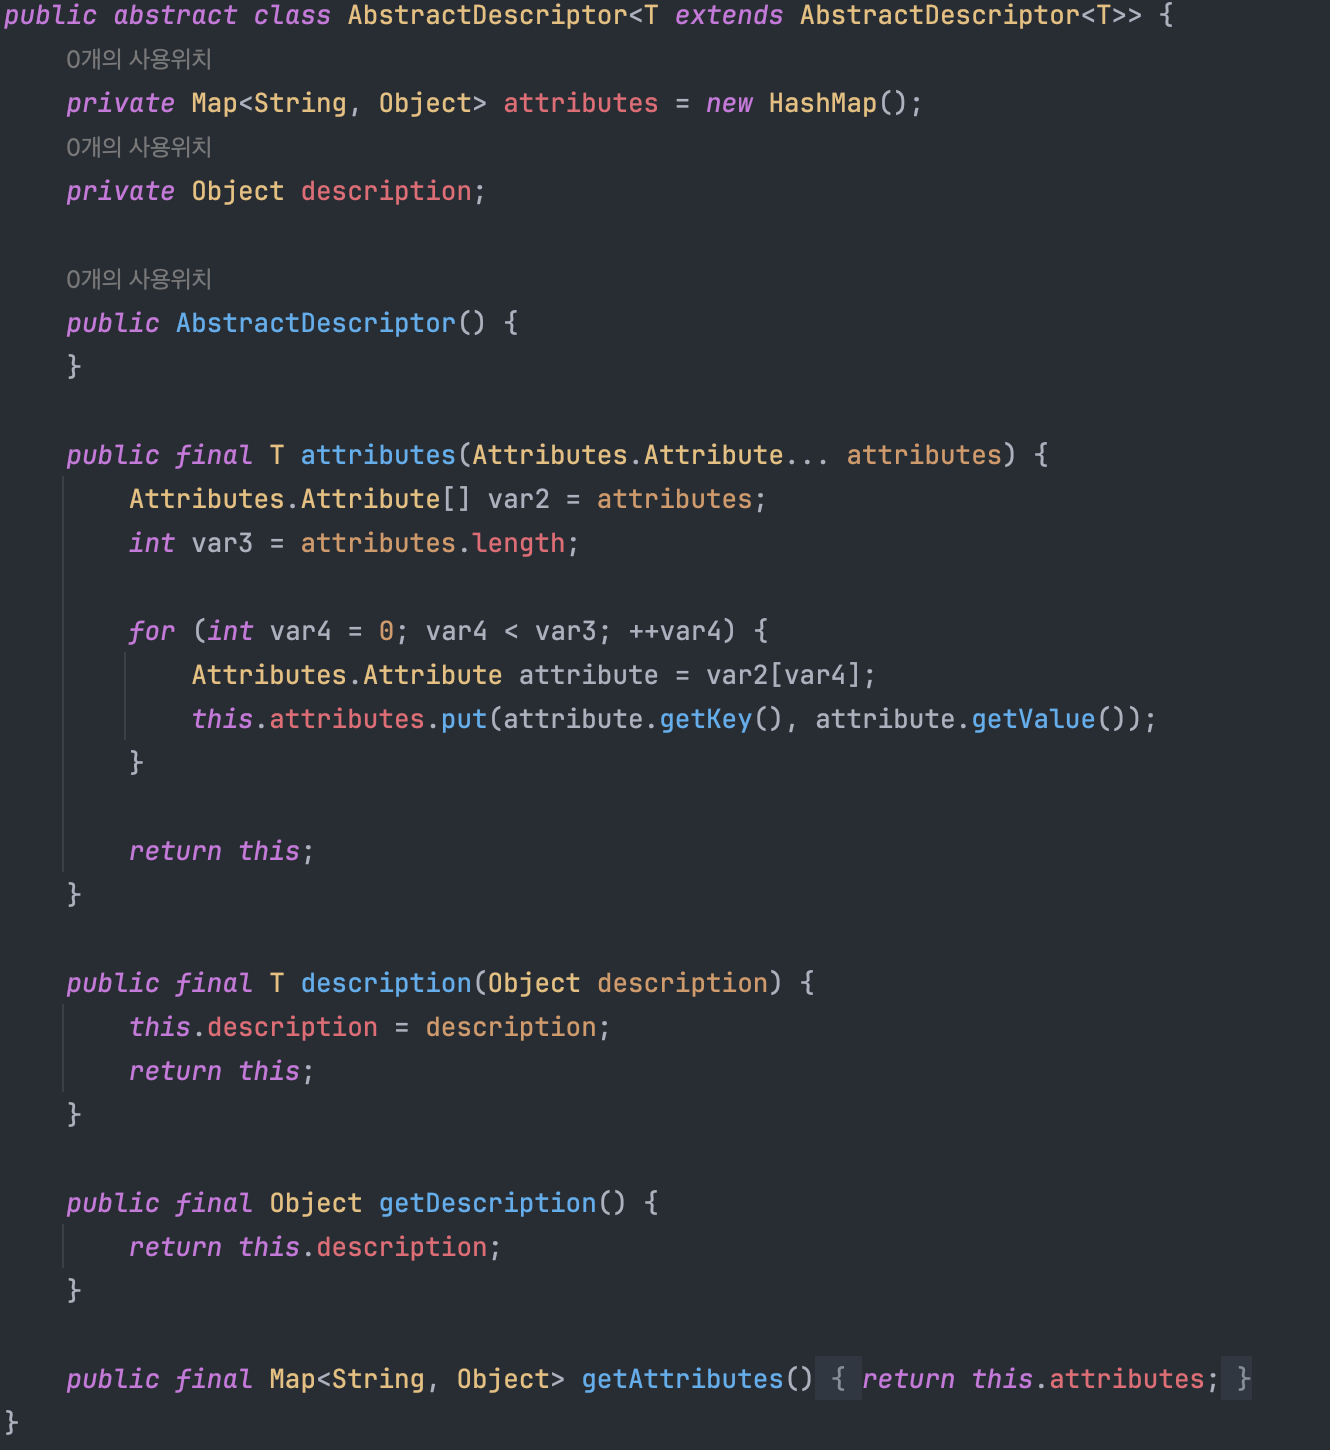
attributes는 필드 테이블에 들어가 있는 값을 커스텀하게 바꿀 때 유용하게 사용할 수 있습니다. 아래는 그 예시입니다.
@Test
    void 게시글을_저장한다() throws Exception {
        // given
        BoardWriteRequest request = new BoardWriteRequest("test title", "test content");
        Board newBoard = 게시글_id_있음();
        when(boardService.write(request)).thenReturn(newBoard);

        // when & then
        mockMvc.perform(post("/boards")
                        .contentType(APPLICATION_JSON)
                        .content(objectMapper.writeValueAsString(request)))
                .andExpect(jsonPath("$.id").value(newBoard.getId()))
                .andExpect(jsonPath("$.title").value(newBoard.getTitle()))
                .andExpect(jsonPath("$.content").value(newBoard.getContent()))
                .andDo(print())
                .andDo(document("boards/save",
                        requestFields(
                                fieldWithPath("title").description("제목"),
                                fieldWithPath("content").description("내용")
                                        .attributes(
                                                key("path").value("hello")
                                        )
                        )
                ));
    }
해당 테스트 코드를 실행하면 새로운 스니펫인 request-fields.adoc이 생성됩니다.

결론 및 확장 예
이번 글은 간단하게 마무리하려 합니다. 올려둔 공식 문서를 참고하면, 자신이 원하는 대로 재조정할 수 있습니다.
그리고 이렇게 스니펫 파일들이 생성되면, 원하는 순서로 adoc 파일들을 배치하면 됩니다.
아래 예시는 프로젝트를 하면서 작성한 테스트 코드인데요, 앞서 말한 attributes를 이용하지 않는다면 Path의 경우 배열의 원소에는 hobbies[].hobby 이런 식으로 깔끔하지 않게 표현되는 점 (이런 식으로 작성하지 않을 경우 테스트 시 예외가 발생합니다.)을 해결할 수 있습니다.

이를 html로 표현하면 아래와 같이 나옵니다.
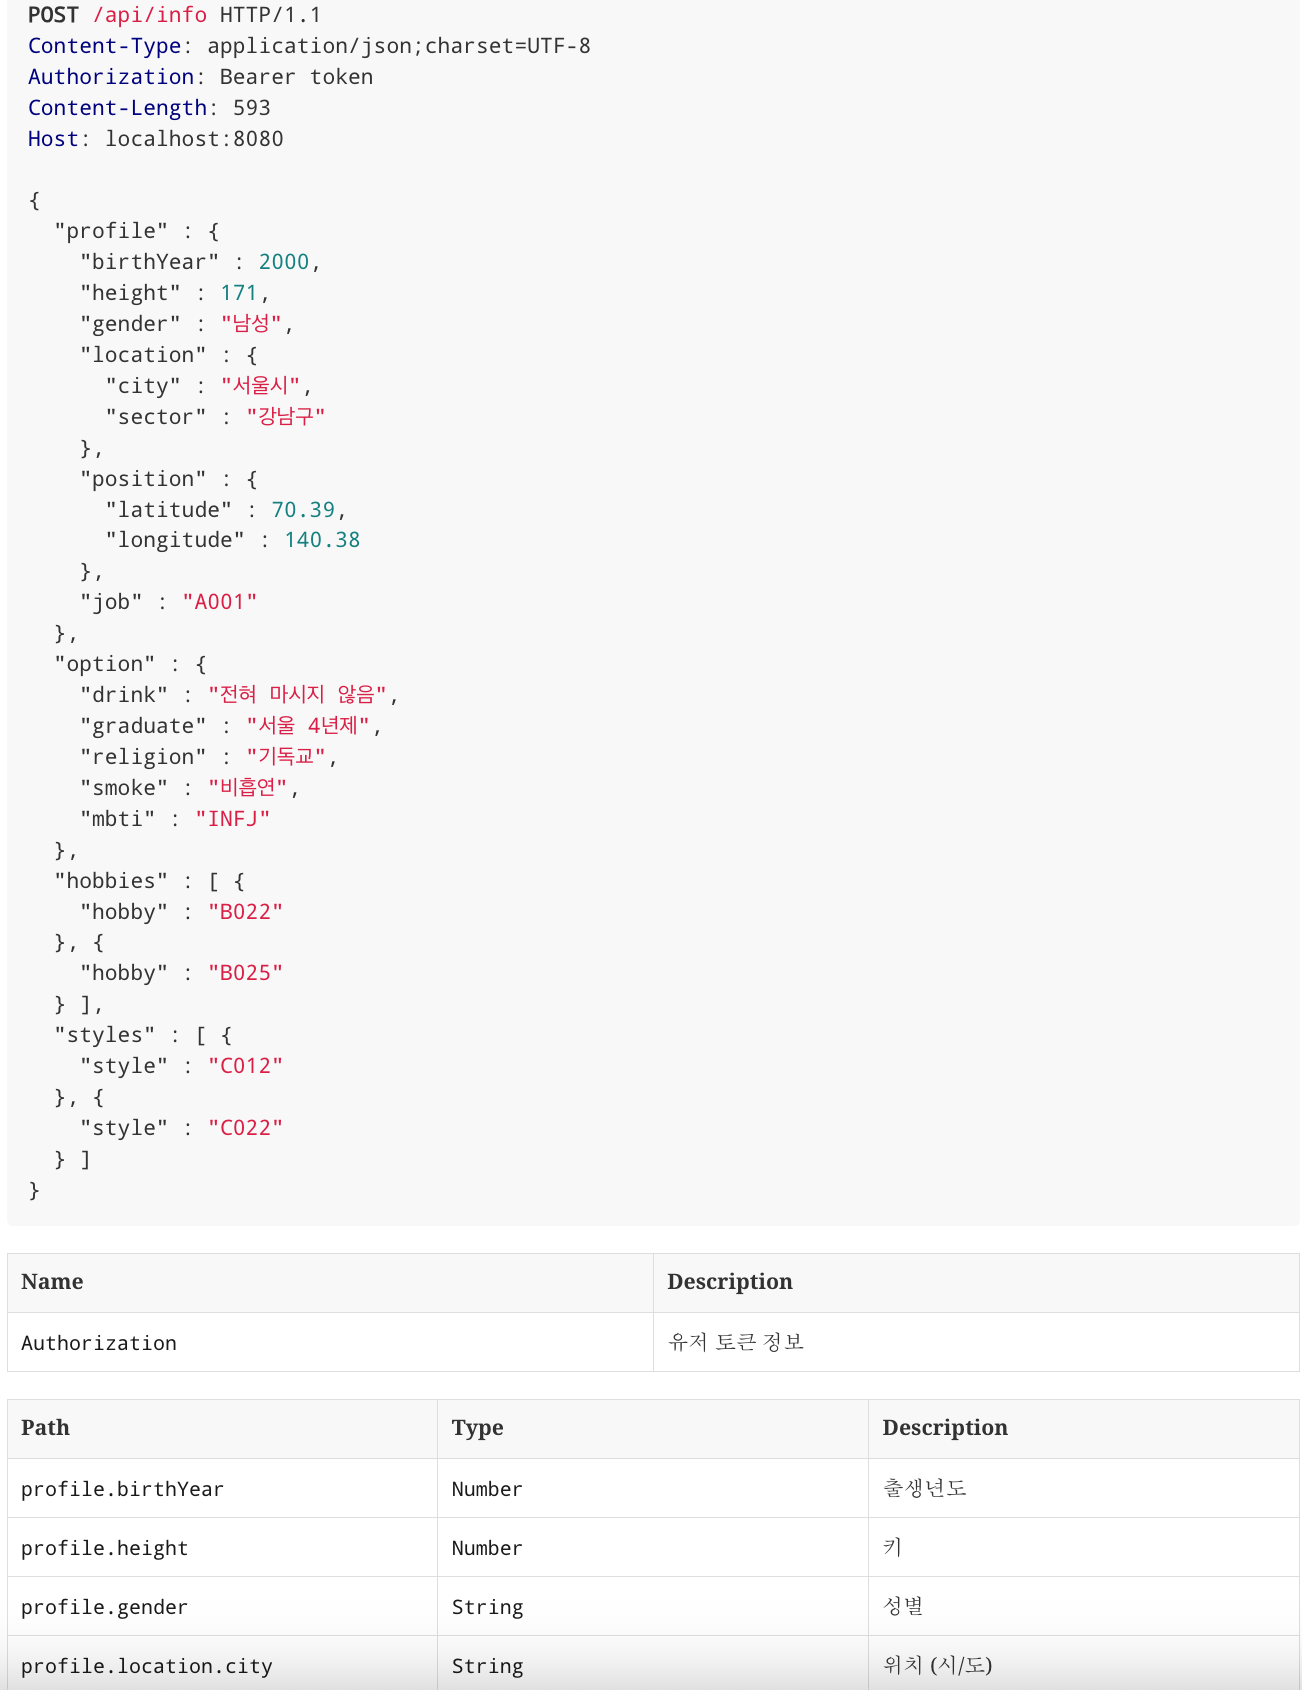
다음 글을 작성한다면 현재 게시판 JSON이 한 줄로 표현되는 문제가 있는데, 이를 마지막 사진처럼 정렬시켜 표현할 수 있는 방법에 대해 알아보도록 하겠습니다.
마지막 주의사항!
마지막으로 알려드릴 것은, 조회의 경우 특정 필드를 요청에 담지 않는 경우가 많습니다. 그렇기에 가끔 요청 adoc 파일을 아예 비워버릴 때가 있을 것입니다.
그러나 이렇게 되면 어느 URL로 요청을 하는지 전혀 모르기 때문에, 요청 필드가 없더라도 http-request.adoc 파일은 꼭 넣어주시는 게 좋습니다.

Reference
'🚀 팁 (기술 적용 방법 등)' 카테고리의 다른 글
| [Github] Github의 Issue와 PR (Pull Request) 알아보기 (PR 병합 후 이슈가 자동으로 닫히게 하려면?) (0) | 2024.05.18 |
|---|---|
| [Spring MVC 🌐] 회원 식별을 해 보자! (2) - 세션 적용 방법 📦 (1) | 2024.02.10 |
| [Spring MVC 🌐] 회원 식별을 해 보자! (1) - 쿠키 적용 방법 🍪 (0) | 2024.02.08 |
| [Spring REST Docs ✍️] 어렵게만 느껴졌던 REST Docs를 적용해보자! (1) (1) | 2024.02.07 |